This Fourth and final post about how I organize our school time, environment and curriculum is about the workboxes.
Sue Patrick's Workbox System was like a dream come true for us last year. We had had a very productive year, until about
Spring Break when we went on our
vacation. Spring Break marked the beginning of Spring Fever for all of us around here. It's like a runner hitting that
"wall". It's so hard to keep going when the books are almost done, the weather is nice, the kids just want to play etc. It was about that time that I read Sue Patrick's Book about her Workbox System. I decided to give it a try since it seemed like an awesome way to plan and organize our school day. (Have I mentioned I like to plan and organize?!) It worked wonders. The kids loved it, I loved it and we finished our school year without the usual wailing and gnashing of teeth;).
This year, I've decided to start off with the workboxes in place, but I've made a few changes. Because our schoolroom tends to be a bit cluttered with all our materials (I'm a curriculum junkie!) the
workboxes that Sue Patrick recommends just seemed too big and added to the clutter. I also decided that Social Butterfly really doesn't need the workboxes. She loves to arrange and organize her desk, and the workboxes aren't necessary for her. BUT, she still wanted some "fun way" to organize her assignment list.
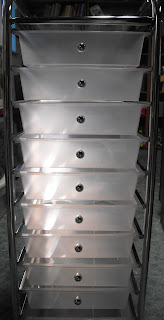
This is what I've come up with for our workbox system. The boys will each be using this storage system I purchased from JoAnn's at a great half price sale:

Not too exciting to look at, I know, but it's going to work great. There are 10 drawers which is just enough for Jetter and more than enough for Builder. Like last year (see pictures here) I'll attach velcro dots to the outside of each box. There will be a number attached to each dot. When the child has completed the work in the box, he will replace the number with a smiley face, or other sort of "I'm finished" type label. On the top of each of these units I will have a box or basket (really?!) in which I will keep those items that the child will do directly with me. Everything in the drawers will be independent work. (But of course my children can and do ask for help whenever they need it.) When the classroom is in order (hopefully with new desks for the boys) I'll take a picture of the whole system in place.
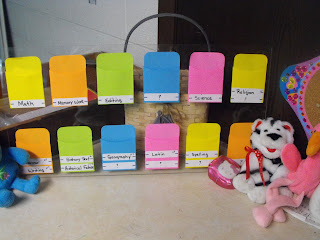
Now, Social Butterfly's system is quite different and very girly. That doesn't surprise anyone who knows my feminine, creative daughter. It's one of the many parts of her personality that I enjoy completely. Here's a picture of her system:
As I said, Social Butterfly likes to organize (and reorganize!) the school books and notebooks in the drawers of her desk. A system like the boys have didn't really interest her, and really, she doesn't need it. The system above is much more to her liking. I used a piece of clear plexi-glass that we had from another project. I attached 12 library envelopes to the outside and wrote a subject on each. I have business cards in the same colors. I will use these cards to write the assignments on and insert them into each envelope. For some subjects, like Math, I will make one card and laminate it (with clear packing tape!). I will use a wipe off marker to write the lesson she is to complete each day. For other, more involved assignments, I will have to write it out on the card. I have a large stack of these cards so I should be in good supply for the year. When she finishes an assignment she will put the card into a small basket
(really!) and if there is a written component, that will go into the "finished assignments" tray that we've had since our first day of homeschooling. Here is a picture of Social Butterfly's desk which she has had organized and ready to go since June:


No comments:
Post a Comment